Thursday, June 6, 2013

Madame Tussaud's Motorcycle Parts

Parts Parts Parts!  I picked up the molds and wax patterns for the first 2 parts from my friend's place Metal Kinetics.  His guy did a great job on the molds and wax patterns.  They are nice big pink silicone molds that should be good for at least 100 parts.


The small 3rd piece for each mold is to make the cored out area inside the footpeg bracket area as shown in the image below:
The jagged edges look haphazard but do a very good job of keeping the mold parts aligned.  The wax patterns looked great with a nice smooth surface.  All the bondo and primer work I did was well worth the effort.
The whole shipment makes me feel like I'm making progress.
I sent 4 of each part out for to Harbor Castings for investment casting in 4130 steel.  They will also heat treat it to an "N" condition to remove internal stresses and match the tubing temper.  I am keeping 2 of each wax for display purposes and in case there are any quick modifications needed for a 2nd revision.  It is easy to modify the pattern using a soldering iron and wax to add or cut away pieces for design changes.


Now for something completely different here's one of the diamonds that Gui was making a ring for at his shop:
It was big and beautiful!  And could fund my motoring projects for a few years, at least!  Unfortunately he needed it back.


Hopefully the casting won't take too long and I'll make another post as soon as parts come back.


Chris

Boxes!!!!

Of parts!!!!!  Like Christmas in June.


More to come....

Saturday, May 4, 2013

Time for a Mold Test Run

OK, I'm finally finished with the parts.  I'm not sure if they are done but I am definitely finished!

After the last sanding and filling primer round I hit them with some plain grey primer and then with a few coats of gloss clear.  They look surprisingly good and I'm sure will produce excellent castings.  I'm going to start with the 2 easier parts and see how the process goes.  Once we get it worked out I'll move on to the next 2 parts that have a bit more complex geometry, especially the large part which may freak them out a bit due to its size.

The brown shafts are teflon impregnated delrin inserts that will be used in the mold to create the core for the swingarm pivot shaft and also to add support to the mold assembly by providing a rigid interlocking piece in the middle of the mold.  This will help prevent the rubber from shifting during injection due to the pressure of the molten wax.  The I used teflon impregnated material to allow easy removal from the wax pattern without marring.


I'm going to drop it off at my jeweler buddy's business on Monday and he'll see what the moldmakers say to doing such a large piece.  They usually deal with ring sized parts with a bracelet every now and then.  The molds look like these shown below.
The extremely jagged cut is on purpose to help keep the mold halves aligned during repeated injections.  These small molds are usually held together with small blocks of wood and a rubber band but I think we will have to make wooden boxes to hold my larger mold halves.  Let's see what the guys with a lot of experience say.  Hopefully it will be 'no problem'.


That's all for now.

Chris

Thursday, April 18, 2013

Almost Done!

Nearly done with these damn plastic parts!  They look pretty good and should make excellent master patterns.

Before doing any additional finish work I had to glue the 3 pieces together that make up the chassis front section where the control arms, damper, and steering assembly bolt.  This is a crucial part for the chassis and is replaceing about 15 pieces that were machined and welded together.

Gluing went smoothly and the final part alignment was great.

The rest of the parts got another round of fill and sanding and now are ready for a final coat of primer.  Peter is busy shooting some color on his truck parts so the paint booth is off-limits for a day or 2 while he finishes.


I should get in there before the end of the weekend and hit them with the final coat of primer then a couple of coats of clear gloss to seal the surface and give it a nice shiny surface to help mold release.

Saturday, April 13, 2013

Yuck, sanding.

One of my least favorite tasks associated with building vehicles is sanding and bodywork.  To me its a dusty mess that magnifies any slight mistake or shortcoming in technique.  Getting these plastic parts from a rough RP surface to something with a decent finish requires naught but time, sandpaper and elbow grease.

I left the parts after a first round of sanding and filling primer.  They looked decent from 5 feet away but on closer inspection still had decent evidence of the stair-stepping artifacts of the layer-based FDM process.


Any surface imperfection will be faithfully reproduced in the mold, then the wax, and finally in the cast steel part so the idea is to make the surfaces as smooth as possible.

Back to the sanding room with a bit of glazing putty and some sandpaper results in what looks like even more of a mess:
The glazing putty is Bondo-like substance that does not require a hardener and can only be applied in very thin layers.  The lack of a hardener means not continually having to mix up a fresh batch and since I only have to fill in .005-.010 voids the thick layer restriction is not an issue.

Once that dries its time for a pair of gloves and a bunch of sanding boards/paper/sponges.
These parts are small and intricate so the usual auto bodywork tools, designed to do large smooth surfaces, can't be used.  Instead is some small boards, sponges and dowels wrapped in sandpaper to get in all the nooks and crannies.

A few hours later and the parts are starting to look pretty good.

Now its time for another coat of filling primer in Peter's paint booth and an overnight dry.
Below the parts is a hood to Peter's 1969 Ford pickup Cummings turbodiesel conversion.  Hint: making sure other parts are properly covered before spraying primer goes a long way to happy shopmates.  Putting things away helps too but that's been a problem of mine for a long time.


The parts are really starting to look nice.
I think one more round of glazing putty, filling primer, and then a final sand and normal primer coat and they will be ready for a sealing coat of clear gloss.  Then they will be ready to have silicone molds cast and wax injected then on to the foundry!

That's all for now.

Wednesday, February 13, 2013

Mmmmmm, plastic.

Got Billy Shears cranking on the radio 'Getting by with a little help from my friends' as I review a boxful of rapid prototype parts sent from a friend, thanks again Dave!  He really gave the Replicator2 a workout and I am very impressed with these results from a $2000 machine.


There were a few hiccups along the way and in the process learned a little bit about the community of open source hardware people. In the software world open source has been around a long time.  It basically means that you tell everyone what you did and how you did it and allow them to use it as they please as long as they acknowledge whose work it is and that if they make improvements they then also make them available to anybody in the same way.  Since code once written is virtually free to copy this is a pretty useful approach for some software.  In the world of hardware, eg. nuts and bolts, open source was never really an issue as so few people had the skill or (more importantly) the equipment to actually produce something it was a moot point.

This is coming up because the FDM machine that David had was not working consistently.  We sometimes got parts that were mysteriously incomplete, like thse.  It is an interesting picture nonetheless as you can see the solid lines which are the outer profile of that particular cross section of the part, the horizontal lines of material that are the support structure and the honeycomb shapes that are the interior of the part.  To save time and material and to minimize sinking and sagging issues the parts are not printed as solid but instead are a thin outer shell with the rest of the interior volume filled with a lightweight and material efficient honeycomb.  The result is a light and strong part that does not have sink issues from having to cool thick sections of near liquid plastic.
and
and
and

After a bit of investigations David found that other people thought the original filament feed mechanism was to blame (they are correct and Makerbot has updated the design in the lastest model), designed a new system and posted the 3D files to thingverse (http://www.thingiverse.com/thing:42250) with instructions on how to do the upgrade!  Although the improvement worked, needless to say I would not be losing sleep at night worrying about an army of self replicating robots taking over!  We were able to print out the update parts with good results.

It is possible that the longer and deeper heat cycle that happens with my much larger parts were pushing the machine past its limits. Whatever the actual issue was the feed fix worked and good parts started to be the norm rather than the exception.  Again, this cost the same as a nice laserjet printer did a few years ago!

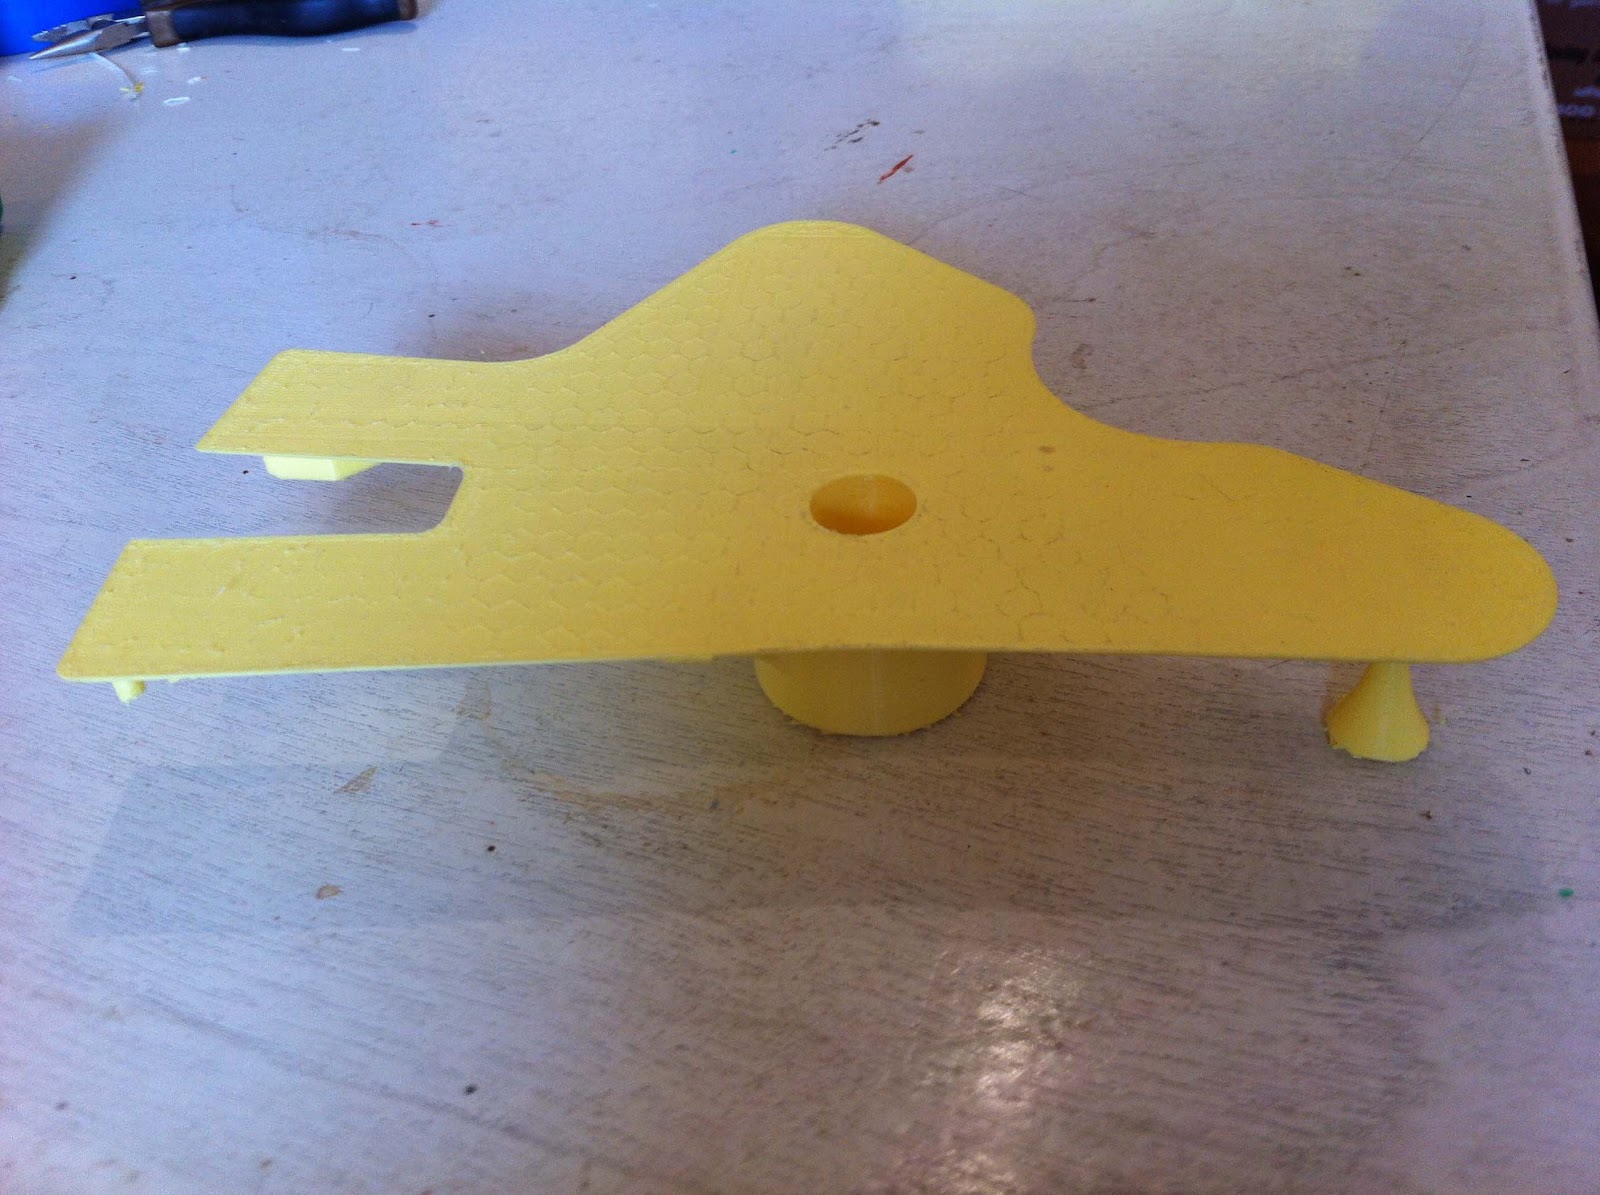
3 of these parts are single piece and only need to be finished before being used to create a silicone rubber mold.  The surfaces of the parts are still a bit rough to make a mold from but that is normal from most rapid prototyping processes.  I'll do a bit of the primer and bondo dance to smooth out the surface imperfections then paint them with a gloss coat to seal and provide a smooth surface for the mold to cure against.  The main thru hole and the cross bearing bore will be done using a dowel as an insert for the mold to both help locate the mold halves and to strengthen the mold assembly to prevent shifting during wax injection.

This moldmaking process is well described in this video from Freeman Manufacturing Co.  The only difference is that I will be injecting a wax into the mold instead of pouring in a hard urethane as they do with the model car.

The largest part was too big to produce in one piece so had to be sectioned up.  The various colors have no meaning and are only due to what color was in the machine at the time.
I was going to design some interlocking features but was wary about the resolution of such small features so settled for straight cuts with a small amount of extra material.  I can sand the entire surface with a flat sanding block and when both angled ribs line up it is accurate.  These 3 sub-parts will then be glued together and a mold will be made from the resulting large part.

Once the molds are done then wax is injected to the void to create a consumable core for the investment casting process.  These waxes are then sent to Harbor Castings who will invest the wax (coat it with ceramic slurry), cast, and heat treat the parts.  I hope to have 4-6 of each part run and weld up 2-3 complete chassis at one time.

Once they come back to my shop I have program and make the fixtures to hold the parts and machine them.  Once they are all machined then a welding fixture has to be made and the parts welded up.  Lots of work ahead but its fun and will result in a very visible sign of progress: a chassis!

The goal at this point is to have a complete rolling chassis ready by the beginning of August.  AHRMA, the US vintage racing organization, is having a big event at the local track, New Jersey Motorsports Park, that all of my garagemates are going to.  There will be a big Rev-It display that we will be displaying the bike at.  Depending on how well things progress with this part of the project I am tempted to also show up and race with the Ductax, our single cylinder technology test bed.

Its been a while since I've been on the track and a dose of excitement and adrenaline is sorely needed.  Time to start exercising now!  If anybody interested in the project is in the area please drop by.  Gate fees are reasonable and there is a huge assortment of cool vintage and some modern bikes with lots of racing.

Friday, February 1, 2013

Some progress, at last!!!

Its been a while since the last update.  Apologies for the gap but had to take care of the usually boring work that pays the bills.  Hope you all had a good Christmas and New Year.  Hopefully 2013 will be the year we finish up the first bike.

In anticipation of that goal, and the convienent timing of a friend having access to a low cost FDM prototyping machine,  I am shifting focus to make some chassis parts.  With a majority of the front end parts complete and the swingarm only needing a fixture to be welded on, completion of a rolling chassis is mostly being held up by lack of a chassis.


There's a bunch of tubing, 3 billet parts, and a 4 castings.  The tubes and billet parts are easily taken care of in my shop but the cast parts need to be outsourced.  For the engine castings I contracted Harmony Castings, an experienced mold designer and fabricator to make the patterns as these were very complex parts with multiple cores.  These chassis parts are much simpler parts with only a 2 piece mold needed. It is something I felt could be done in-house.  As with all molding and casting operations the cost of the patterns is the lion's share of the price.  If I were able to make the patterns myself then the castings could be produced at a very reasonable cost.

The engine crankcases were made with a modified sand casting technique and cast in aluminum in keeping with the current best practices for engine crankcase production.  These chassis parts will need to be in steel to be welded to the steel tube members.  Since the parts are smaller and don't have any coring needs I chose the investment casting process.  This is one of the oldest metal casting techniques in existance and makes use of an expendable wax copy of the part and an expendable cermaic mold.  The investment casting process has several advantages comapred to other casting processes:
  • few geometry restrictions
  • near net shape minimizes machining needs
  • thin wall capability
  • high casting tolerance
  • high casting integrity
  • high quality surface finish
The investment casting process is a multi step casting process that takes wax models of your parts which are then covered  with a ceramic coating (the 'investment') that is then cured and fired to melt out the wax and produce a hollow ceramic shell of which the hollow internal volume is the part that you want to make.  This hollow ceramic shell is then filled with metal, allowed to cool, and the ceramic shell broken away to reveal the final metal part.  Investment casting is used extensively in jewlery making and many industries where small near net shape castings are needed.  The first step is to have wax copies of your parts made with appropriate scaling to accomodate the various shrinkage ratios in each step.  For making one part you can machine or carve a wax copy of the part you use but then since you have only one wax you only get one cast part.  To get multiple parts you need some sort of mold to cast the wax to make multiple copies.  If you have high volumes of parts you can make an aluminum mold that you inject the wax into.  For the low to medium production volumes, where these parts are, there are some lower cost but still high quality options.  The most common is to make a silicone mold around a scaled master copy of your part.  The flexible silicone mold can easily accommodate no draft, undercuts and very small molding details.  Since the silicone molding process is done at room temperature and pressure the master pattern does not need to be made from a strong material.  It can be wood, foam, or.... plastic.


Enter David Celento, a fast 125 rider, architect of the highest caliber and all around great guy.   I met Dave years ago at a USGPRU event at Jennings GP Raceway in Florida.  Up to this point in my life I had never seen matching Grand Prix motorcycles painted in seafoam green.


Besides being bike color-challenged him not being too pissed that I had glancing contact with his wife on the track (she's a 125 racer too!) convinced me he was a stand-up kind of guy.  He and the missus drove from track to track with a beautiful Airstream trailer that we spent many a Saturday evening drinking wine and bench racing in.  He now has access to a low cost rapid prototype machine that will enable us to create the patterns we need from an ABS-like plastic.  The Makerbot rapid prototyping machine he has is in need of some dialing in and boy do I have some parts that can help out!

The Makerbot printer is one of the latest in a line of partial DIY rapid prototyping machines that have become quite competent if set up properly.  For an approximately $2000 sale price the bang for the buck is very high.

If not set up properly they can make a mess.

But when the machine is properly set up the results are impressive:

Now that the machine is set up properly and making plastic parts the next step is to spray it with a few coats of filling primer, sand it all smooth, then spray it with a gloss clear coat to seal the surface with a very smooth finish.  The part will be cast in silicone and any scratches or fill patterns will be accurately replicated in the silicone then the wax then the metal part, so in order to get a very smooth final part finsh we need a very smooth master surface finish.  Peter will be helping me out with the sanding and painting process.

Once the parts get here I'll post some pics of the finishing and silicone mold making process.  I hope to have a productive few months ahead of me with the intent of having a rolling chassis ready by the beginning of August.

That's it for now but more is coming soon.