Monday, July 29, 2013

A needed distraction

I did mention this a few months ago but have not posted again being in fear of the universe getting too much of an advance notice of my plans and throwing a wrench in the works.

I'm making a long needed return to the racetrack this weekend at the AHRMA event at New Jersey Motorsports Park.  I'll be riding the Rotacular, something I have not done for almost 5 years.  I don't think I ever raced the bike (Todd Puckett was my rider) with the Ducati head and fuel injection so hopefully it will be a great weekend rolling on the throttle.  Of course there is a strong possibility that it will be a long weekend rebuilding the engine but what the hell.

If anyone is in the area it will be a great time with lots of really cool vintage machinery and a bunch of modern stuff thrown in for good measure.  And the Rotacular.

I've spent a few days looking the bike over from a chassis perspective and everything looks nice and solid.  After getting a couple of new batteries (one for the bike one for the starter) I attempted to start the engine.

SWEET!!!!  It started on the first try and sounds as mean as ever.  That's 560cc of cylinder firing every other revolution and putting out mid-70s Hp at the rear wheel.  Tomorrow or Wednesday I'll get the bike on Peter's dyno and do a few runs under load to make sure its ready for the track.

Racing happens on Saturday and Sunday from 12-5.  I will be racing in Sound of Singles 1 (my main class) and Sound of Thunder (the twins bump class) both days or until the fuse on my engine runs out.

I'm excited.  Very excited.  And a bit nervous.  And that's good.  Can't wait until the end of the week. Its been a long time since I've been woken up to the sounds of racebikes starting.

Wish me luck!


Chris

Wednesday, July 17, 2013

Revelling in cast steel parts.


Parts!!!!!!!!!

There's something about getting a box of parts made using a technique that you cannot do in-house that is somewhat special.  I blast out billet parts all the time and sometimes barely pay attention to them where non-machinists are blown away.  Yet opening the box and getting these cast parts, which are much less accurate and have less bling factor than a nice billet part, was really exciting!  Maybe because it means that a rolling chassis is not too far away, maybe because it's just another cool motorcycle part, or maybe I just got up on the right side of bed today, but I'm happy.

We can see that there are an odd number of parts.  Apparently they had one investing failure during the process and that part didn't make it.  He's gone.  And there was nothing we could do.  This is normal for a first time running parts and since I was hoping to get 50% success actually getting over 80% is great.  My plan is to machine 2 sets and leave the rest as is in case there are modifications that are needed.

The shot below really shows the progression of the part from concept to production.
The leftmost shot is the swingarm area of previous designs.  There's a lot of thinking involved between steps 1 and 2!
The gold part this is where this piece goes in the overall scheme of things.


The parts have great surface finish and in the next few days I'll do some 3D scanning and 2D inspection to see where, if at all, the parts deviate from nominal.

That's all for today.


Chris

Tuesday, July 16, 2013

Arrgh!

The Box came in.  The box cutter came out.  The phone rang.  That was the end of my bike time for the day.  Damn.  Will resume tomorrow with a detailed examination.


Chris

Friday, July 12, 2013

And the money shot!

They just sent this over, parts are ready to ship!  Simply beautiful.  And a great shot too!

With the parts looking this good I'm tempted to give one frame a clearcoat finish.


For a change of pace I'm off to help Scott Kolb a bit on his Bonneville LSR bike this weekend.  You gotta earn the trip out to the flats!

Thursday, July 11, 2013

So Close!

Just got an email from Harbor Castings with lots of pretty pictures of my parts going through the investment casting process!  There's something extra cool about seeing process pictures of your parts going through the process instead of some generic Google search images.

The wax parts I sent them looked like this:
The first step in the process is to attach the parts to a 'tree'.  The function of the tree is to create a large passageway for molten metal to fill the parts and to provide a reservoir of material to assist in keeping the molds fully filled as the metal cools and shrinks in volume.  Arranging several parts on the tree allows the foundry to make the most use of the available pour size.  These guys didn't skimp on the tree or runner sizes!  It may seem wasteful but all of the scrap can easily be recycled with minimal effort as they are a foundry.  The small red tubes are vent lines to allow gas to escape as the molds are being filled with molten metal.  The white cone at the bottom is a ceramic part that the investment bonds to and which forms the opening into which the metal is poured.  Looks like a textbook tree.

Once the parts are on the tree it is time to 'invest' them.  In production this is an automated process that repeatedly dips the tree assembly into a fine ceramic slurry and then lets dry.  The composition of this material is important as it needs to transmit fine detail yet be strong enough to survive handling and thermal shocks.  After several coats the wax parts now have a thin ceramic shell surrounding them.  The shell is still uncured 'green' ceramic so is very fragile.
As more layers as added the part becomes decidedly puffy looking.  After several layers of a fine slurry that  closely mirrors the parts surfaces and textures a couple of thicker, more coarse layers of ceramic are added to make the assembly more damage resistant.  Any damage from here on in makes the part scrap so it pays to pay attention and take care.
The tree is now ready for the next step in the process which is melting the wax out and curing the ceramic to a hard durable shell.
A steam autoclave melts the wax out and ensures that the inside of the ceramic mold is completely empty.  Note that the hollow cone that was the ceramic base of the tree now seems to be an integral part of the entire assembly.  The insides seem extremely clean, sign of a complete burn out with high quality wax.
The hollow tree is now fired in a high temperature oven to harden the ceramic.  Yes, that is really hot.
While the ceramic is still hot it is put into a sand box and molten metal is poured into the opening at the top of the tree.  A filter is placed at the opening of the tree to filter impurities from the metal from getting into the mold.  The sandbox is to slow the cooling of the mold and the metal which minimizes built in casting stresses.
 Yes, its still really hot.
Its like my own mini sun!  Now to slow cooling even more a drum is placed over the filled mold.
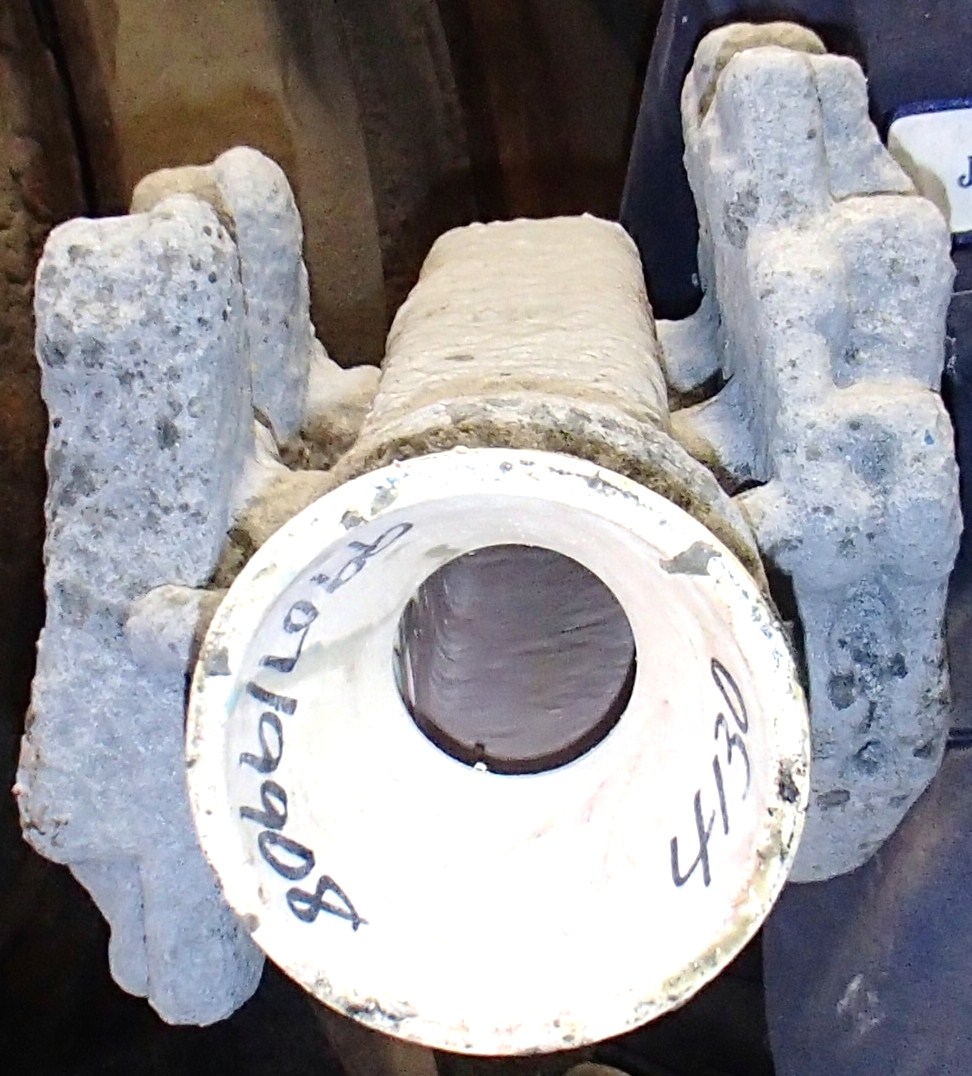
Once the parts cool it time to unwrap them.  The easiest method is to just shatter the ceramic off of the metal parts resulting in this stage.


Most of the outer material just falls away but the material inside the pockets requires more effort, or a vibratory tumbler, to get out.  The central sprue of the tree is now a solid block of 4130 steel that can be recycled after being cut from the parts, which is happening here.

The parts are then given a light bead blast to remove any remaining investment material and mold scale.
SWEETNESS!!!!!!

The parts look great and the smooth surface finish is a relief after all the work that went into finishing out the Makerbot mold patterns.

Now I need to find some time to put into machining both the fixtures and the parts.  Now that these have come out so well I'll start the same process for the remaining 2 parts: the lower chassis crossmember and the front suspension mount.

Slowly but surely progress is being made!


Saturday, June 15, 2013

Some virtual progress

I heard back From Harbor Castings and it will be about a 2-3 week turnaround for my parts.  In the meantime the machining fixtures need to be made.  Part of the design process is having a decent understanding of how any given part will be made.

In the case of the two swingarm pivot members I knew that the part was a casting and would require a decently complex fixture to hold properly.  I knew from experience that the trunnion and baseplate technique works extremely well so would use that as a basis.  Knowing what surfaces need to be machined led to a part orientation like this:
It may seem counter-intuitive to not lay the part down but the needing access to the top and bottom of the part and the two pockets for the main frame spar tubes dictate this placement.  It allows easy positioning into these orientations for a simple contour operation to create the pockets and unrestricted access to the front and back of the part:

The next step is to put a big block of material around the part:
And cut it away with that ever-sharp unbreakable end mill of 3D CAD.  Michelangelo was on to something when he said that inside every block of material is a shape that needs to be set free.  I think he was the first machinist, among other things.

Then add in some fixture points and clamping screws and voila, a useable fixture:

The purple part is an alignment pin, the small red screws are clamping pins that hold the part, and the big red screws are structural members that close the open end of the 'U' shaped fixture.  These 2 screws add a lot of stiffness to the overall structure and the complete assembly should allow accurate one-setup machining.

I went through the same process for the chain side part and ended up with the following arrangement:
Here's the donor material that will become these parts:


I am pretty busy with work these days but hope to get to these before the castings get back to me.  For the ADV members in our viewing audience that work I need to get done is 2WD stuff!

Chris

Thursday, June 6, 2013

Madame Tussaud's Motorcycle Parts

Parts Parts Parts!  I picked up the molds and wax patterns for the first 2 parts from my friend's place Metal Kinetics.  His guy did a great job on the molds and wax patterns.  They are nice big pink silicone molds that should be good for at least 100 parts.


The small 3rd piece for each mold is to make the cored out area inside the footpeg bracket area as shown in the image below:
The jagged edges look haphazard but do a very good job of keeping the mold parts aligned.  The wax patterns looked great with a nice smooth surface.  All the bondo and primer work I did was well worth the effort.
The whole shipment makes me feel like I'm making progress.
I sent 4 of each part out for to Harbor Castings for investment casting in 4130 steel.  They will also heat treat it to an "N" condition to remove internal stresses and match the tubing temper.  I am keeping 2 of each wax for display purposes and in case there are any quick modifications needed for a 2nd revision.  It is easy to modify the pattern using a soldering iron and wax to add or cut away pieces for design changes.


Now for something completely different here's one of the diamonds that Gui was making a ring for at his shop:
It was big and beautiful!  And could fund my motoring projects for a few years, at least!  Unfortunately he needed it back.


Hopefully the casting won't take too long and I'll make another post as soon as parts come back.


Chris